First American includes support for performing refunds and having the refunded amount returned to the customer's bank account.
This process is used when a customer makes a purchase but they later return some or all their purchased items.
Items can be refunded for a variety of reasons such as change of mind, damaged items, faulty, etc.
Note that the refund function can only be used after a bank settlement has taken place (which is typically at the end of the day or overnight).
If the customer has returned on the same day as the original transaction took place, the Void Sale function will need to be used instead.
Refer to the First American - Void Transaction page for more information about using Void Transaction.
If the customer has returned on the day after the original transaction took place, the refund function can be used to refund the individual items from the transaction.
The summarised process of performing a refund involves:
Adding items to the sale followed by selecting the items and pressing the refund button.
Alternatively, the refund button can be pressed first followed by adding the item to be refunded.
Once all the items to be refunded have been added to the sale using either of the above methods, the Enter button is then pressed which allows a Tender to be selected.
Typically, the same tender option that was originally used to sell the items is then selected.
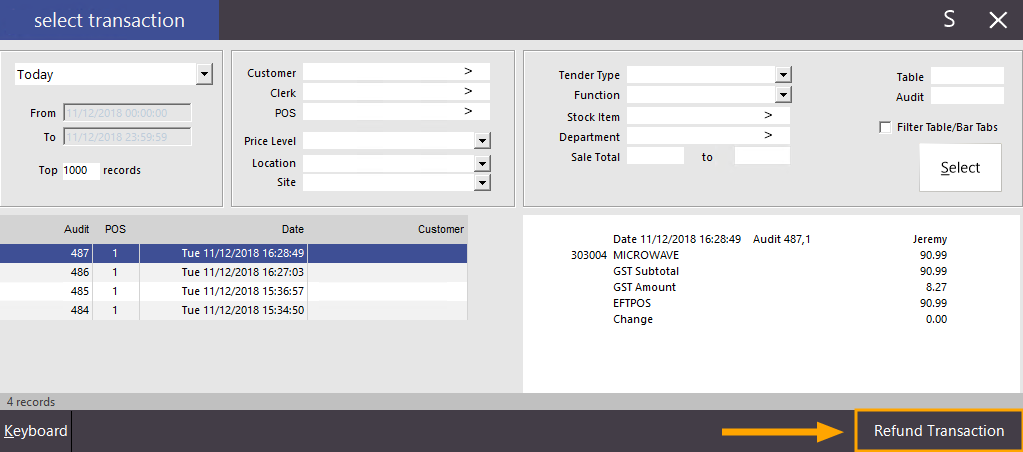
When pressing the EFTPOS button during a refund on a system configured with the First American EFTPOS Integration, Idealpos will display a screen showing a list of Journals/Transactions.
The operator will select the original transaction which the refunded items were purchased on.
The system will then refund the total amount of refunded items into the customer's bank account.
To perform a refund using the First American EFTPOS Integration, follow the steps outlined on the Refunds page.
Once the steps on the Refunds page have been completed and the EFTPOS button has been pressed, Idealpos will display a screen showing a list of transactions.
Select the date on which the original transaction occurred, then scroll through the list of transactions until you find the matching transaction.
You may click on any transaction in the list to see what items were originally sold in that transaction - a list of the items included in the transaction will be displayed on the right hand side of the Select Transaction window.
Once you have found and selected the matching transaction, click on the "Refund Transaction" button located on the bottom right corner of the Select Transaction window.
After a short period, the receipt printer will print out a refund receipt showing that the refund has been processed.
The refunded amount shown on the receipt will be deposited back into the customer's bank account.